Record a Macro in Microsoft Excel
The following are the instructions you need to record a macro, to make the macro available for use in any single file or for use in any file you open, and to assign a toolbar button to run the macro.
One of the best reasons for creating a macro could be that you must format files from external sources on a daily basis. If you are fairly accomplished in Excel, you will know that there are several steps you must take to accomplish it. The next time you need to perform this or a similar task, record the tasks as a macro and you will only have to press a button to perform them again.
Step 1: Prepare to Record
If you would like the macro to be available in a specific file, open that file.
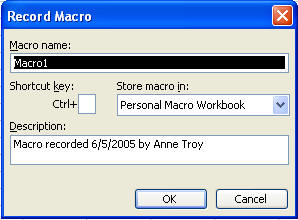
From the menu, choose Tools Macro Record New Macro. The following dialog box will appear:

In the Macro name box, enter the name you would like to use for your macro. It must not have any spaces and should not contain special characters.
Decide where to store the macro. If you would like it available in the current workbook only, hit the Store Macro in dropdown box and select your active workbook's name. If you would like the macro to be available for use with any file, select Personal Macro Workbook (which is a file that will be called Personal.xls).
Give the macro any description you like in the Description box. By default, the description will state the date the macro was recorded, and the user name. The user name automatically comes from the information under Word's Tools Options, User Info tab.
The Stop Recording toolbar appear. There are two buttons on the Stop Recording toolbar. The square is used to STOP recording and the lines and circle are used to PAUSE recording.

Tip: If you accidentally close the Stop Recording toolbar, go to View Toolbars and click on the Stop Recording toolbar. If you accidentally use the X on the Stop Recording toolbar to stop recording a macro, go to View Toolbars and click on the Stop Recording toolbar.
Step 2: Record the Macro
Perform the tasks you would like your new macro to perform for you. If you need to interrupt the macro recording to perform some non-related work, press the Pause button on the Stop Recording toolbar. Press the Pause button again to continue recording. Hit the Stop button to Stop recording when you have finished recording your tasks.
Step 3: Test the Macro
Always test a macro, particularly if you have created it to run for someone else. To test the macro, hit Tools Macro Macros, and double-click the macro name.
Step 4: Assign the Macro to a Toolbar Button
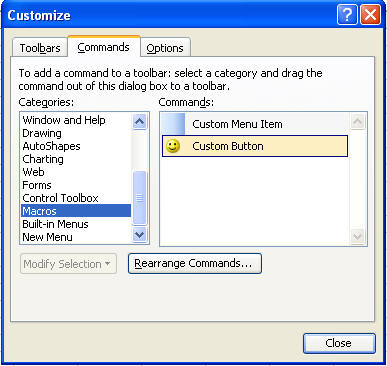
Hit Tools Customize and choose the Commands tab. The following dialog box appears:

Under the Categories (left), scroll down and choose Macros. Click on the smiley icon and drag it up to any location you choose on any toolbar you choose.
While dragging, you will see an X hanging on your mouse pointer. It is not safe to drop the button. Your mouse pointer must have a plus sign (+) hanging on it before you lift your finger from the mouse or the icon will not be placed.


Once your icon is placed on a toolbar, click the Modify Selection button, and various options will appear. The following describes only those options that apply for our purposes here:
Name: Type in the name of the macro as it should appear on your toolbar if you are going to use the text style button (described below).
Reset Button Image: Select this only if you have begun to edit an existing button image and you would like to reset it to the default.
Edit Button Image: Select this option to "draw" your own button image.
Change Button Image: Select this option to change the existing button image to one of your choosing from Office's collection of button images.
Default Style: Clicking this button makes the button on the toolbar show just the icon and no text.
Text Only (always): Clicking this button makes the button on the toolbar show just the text as it is shown in the Name box, which you can change.
Image and Text: Clicking this button makes the button on the toolbar show both the icon and the text.
When the button appears exactly as you would like it to appear on the toolbar, hit the close button on the Customize dialog box.
The first time you hit your new toolbar button, you are asked which macro you want it to run. You'll pick your macro from the dialog that pops up. The next time you click your toolbar button, it'll run the macro.