An Extreme Tutorial on Styles in Microsoft Word
This tutorial uses Word 2003, however virtually all applies to Word 2002 and many things apply to lesser versions.
Styles can be incredibly confusing. There's a lot to them, and rightly so. I hope that by the time you are done this tutorial, you understand them a whole lot better than you did, but don't expect to remember everything right away.
For more information on styles see:
- Create a Style in Microsoft Word
- Using the Organizer in Microsoft Word (copy styles from one document or template into another)
- Having Difficulty with Bullets and Numbering in Microsoft Word
- Format Changes Entire Document in Microsoft Word
And so that you can best follow along for our tutorial, change your Word settings as per this article.
Then, download the sample file I have created so we don't have to mess around with creating sample paragraphs and so you have exactly what you see in our screenshots.
We are working in Print Layout view (ViewPrint Layout) at about 100% zoom. Also, turn on your Show/Hide button.
Also, set your menus so you can easily follow along using the settings described in this article.
If at any time during this tutorial, your results are not as expected, you may wish to rename (at least temporarily) your normal.dot file. See the instructions here.
Please read this article to ensure that you understand about styles to a degree that this tutorial makes sense.
Paragraph Styles
This tutorial uses stylestutorial.doc, so please open that file.
Place your cursor anywhere in the text "Heading 1". Hit FormatStyle and choose Heading 1 from the task pane at the right of your screen.
Note that to apply this paragraph style, we didn't have to select the paragraph, we only had to have our cursor placed inside of it, and the entire paragraph (the space between the last paragraph return-if any-up to and including the following paragraph return) becomes formatted.
Did you know that paragraph formatting is stored in that paragraph return? That's why, sometimes, when you delete a paragraph return, you suddenly lose your formatting.
Select each of the Headings 2, 3, and 4 in the document and apply that style to its text. Hard to find Heading 4? Look down at the bottom of the Styles and formatting task pane and change it to "All Styles":
Did you know that using Heading 1, 2, and 3 will give you a method to quickly create a Table of Contents? See this article.
For each of the remaining paragraphs of text, apply the style to which that paragraph refers: body text, list bullet, etc. Stop applying styles when you reach the paragraph "Stop here."
Go back up to the paragraph to which we applied Heading 1. Select it and keep it selected until you're directed to select something other paragraph. Format the font to be Verdana, 18-pt, red font. Also, hit FormatParagraph, click on the Line and Page breaks tab, and choose Page Break Before. Hit OK.
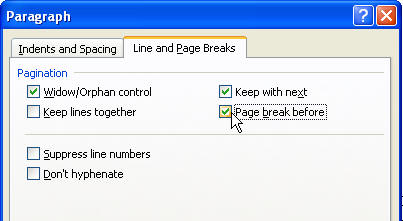
"What's the benefit of such a setting?" you may ask. When setting up documents that may be printed by Judy at home on her little HP printer or by Sue over at BigCompanyUSA on the whopping quarter-million-dollar color printer, inserting manual page breaks can be dangerous. (See this article for more information.) Using this setting can keep us from inserting manual page breaks. There are other, similarly friendly but underused settings just like this in Word.
You'll notice that it didn't put a page break before our paragraph because Word is smart enough to know this is our first page.
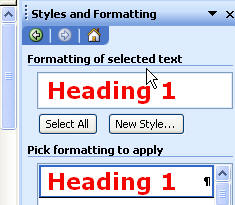
Now, here's where I sometimes got confused when I was learning the newer versions' styles. See how, in the graphic below, the Heading 1 is red, and yet, below that, it doesn't show us the Font color. Note that the heading above the red text says "Formatting of selected text".
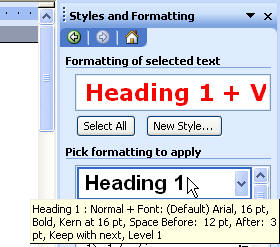
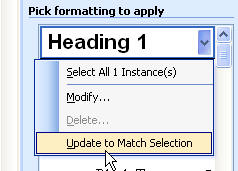
Right-click the Heading 1 under "Pick formatting to apply". Choose Update to Match Selection. You have just altered your Heading 1 style in this document.
And now the two match:
Your document should currently look like this:
What are those little squares for? The squares you see that look almost like bullets, and that are to the left of all of our heading styles, tell us that there is some paragraph formatting in use under the Line and Page Breaks tab. While our Heading 1 has Page break before selected, it and all the other Heading styles also have Keep with next selected. Keep with next is another very cool setting that keeps us from having a heading stuck at the bottom of a page all by itself, and we don't have to enter a manual page break to make it go to the next page. If the heading and its following paragraph don't fit on the this page, it takes both to the next page.
Have you noticed that we have no paragraph returns between our paragraphs? That's because Word has another cool setting called Space before and after. This lets us set paragraphs apart from each other without having to put in all those paragraph returns. We could also decide we want a little more space between the paragraphs, so rather than select all those returns we placed between them and making the font bigger, we can simply change the Space before and after in the FormatParagraph dialog for that style, and they're all changed all at once! You can see that the Body Text and Heading styles are using this setting, but the bulleted and numbered lists are not.
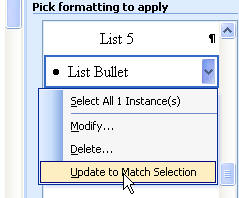
Select the List Bullet paragraph, and hit FormatParagraph, and set the after spacing to be 6 pts. You can use the arrows to go up or down in 6-point increments if you like. I like to type it in myself because I often use points that are not in 6-point increments (I like 3 pts before and after in my tables, for instance). Hit OK.

Right-click List Bullet in the Styles and Formatting task pane, and choose Update to Match Selection.
Repeat the space before and after settings on the rest of the styles where the name begins with "list", and update each style to match the selection.
Hit the Zoom drop-down on the Standard toolbar and choose Whole Page.

Your page should look like this:
Return to Page width or some other comfortable zoom setting.
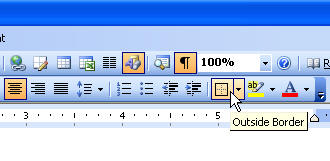
Go down below the Stop Here paragraph in the document and select the paragraph about Notes. Center it, then put a border around it using the Outside border toolbar button, as shown:
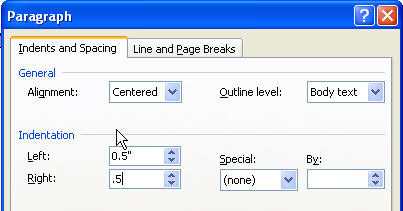
Hit FormatParagraph and put a half-inch indent on both left and right, and hit OK.
Your new Note text should look something like this:

You may want to put 12 points before and after your Notes paragraph to allow a nice amount of white space. When you're done, Update the style to match the selection as we have been doing with other styles.
I often like to put colored bottom borders (use the FormatBorders and shading, Borders tab) on my Heading 1 styles. It's a nice break in the monotony of a manual and the border goes all the way across the page. Looks something like this.
Character Styles
In my opinion, Character styles are a lot less useful. However, if you created a manual and the boss said they wanted the names of any companies to always appear in red, you could use a character style. Then, later, someone says those company names must actually be green and italic, you simply modify the character style instead of going through and formatting each company name individually.
Choose the words "Company Name" where it first appears in the last paragraph of the sample document.
A character style might be any text that is bolded. For instance, suppose we always want our company name to appear in bold red font, regardless of the formatting of the paragraph in which that text resides. We can create a character style for it. I've called it MyCharStyle in the graphic below.
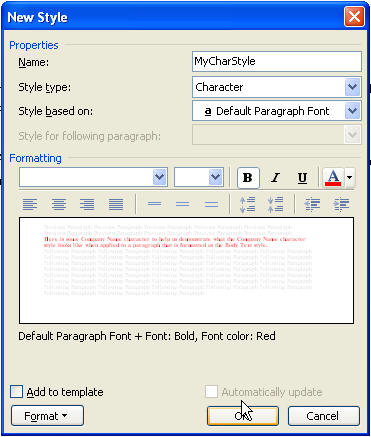
As you may know, if you select some bold text and hit the bold button again, it actually unbolds it. Likewise, when I apply the bold MyCharStyle style to some of the words in a paragraph where the style is already bold, it unbolds it, as you can see below. Be careful what font attributes you choose when creating your own character style.
The following attributes cannot be built into Character styles: Tabs, paragraph spacing, paragraph alignment, paragraph indents, bullets, numbering.
Now, select the next instance of the text in that paragraph that says "Company Name" and apply the style to it. Select each instance of "Company Name" thereafter in the paragraph and hit the F4 key, which repeats the last command and should apply that character formatting to each instance of a company name.
Graphics and Captions
Select the Office Articles logo. Center it. Format the paragraph to have 12 points before and 12 points after. Set the Style for the following paragraph to be Caption. Set the Line and page breaks tab to be Keep with next so that your graphic "sticks" never appears at the bottom of a page with its caption on the next page. You may have to right-click on the Graphic style and choose Modify selection to set the Style for the following paragraph. Did you notice? Be sure to Update the style to match selection if you make any changes after you create the style.